An idea for making a quick dungeon using Battleships as a template for a Grid-Crawl.
![]() A more readable pdf version can be found here: Link
A more readable pdf version can be found here: Link
Battleships Dungeon
Using the Battleships game as a template to procedurally generate a
20 room, 2 level (Grid Crawl) dungeon
Method
This is a method and explanation of how to use the Battleships game as a template to make a procedural dungeon map in about 5 minutes. Of course, this could be any kind of point crawl, not just a ‘dungeon’. A simple one page method (without the explanations) is given at the end of this document for easy use.
:: Step 1
Start with two blank ‘Battleships Maps’ (probably best to renumber the top line ‘1 to 10’ rather than ‘A to J’), e.g.:

Left Grid Right Grid
This can be done with the physical game i.e. with the plastic pieces etc., or by simply using paper grids. The Left Grid is the entry level and the Right Grid is the second level of the dungeon.
:: Step 2
Place the ‘ships’ on the grids (as if you were playing the Battleships game). If doing this on paper grids, just shade the squares, e.g.:

Left Grid Right Grid
:: Step 3
In each of the Grids put a Red Peg in the diagonal positions, except for the top leftmost cell (i.e. put these in positions 2;2, 3;3, and 4;4 etc.), e.g.:
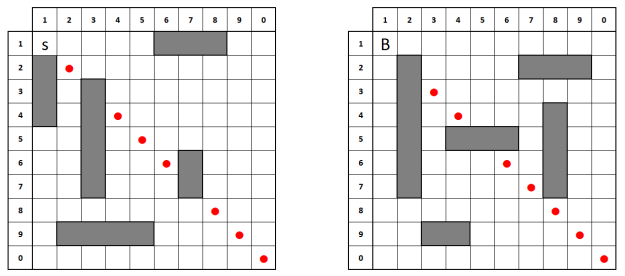
Left Grid Right Grid
These Red Pegs are simply a visual reminder that these rooms do not connect to themselves.
The START location is on the Left Grid in cell 1;1 (marked with an S). The BOSS encounter (or adventure goal, quest item etc.) is located on the Right Grid in cell 1;1 (marked on with a B).
The battleships are being used in this method to introduce an element of chaos, and to force the DM out of any unconscious bias in later peg placement.
:: Step 4
Put a White Peg in each Column somewhere, i.e. where there is a gap (shown as light shaded Blue Pegs below), e.g.:

Left Grid Right Grid
:: Step 5
Look across each Row, if a Row does not have a White Peg in it somewhere, then add one (shown below as light Green Pegs), e.g.:

Left Grid Right Grid
In the example above, this would be in Rows 6, 8 and 10 on the Left Grid; and on the Right Grid that would be Rows 4, 7, 9 and 10. If doing this on paper the Green Dots could represent secret doors. However, doing this might make the dungeon appear more linear looking to the players. To increase interconnectivity, hence ‘jaquaying-the-dungeon’, simply add a few more pegs (e.g. 3) at random.
:: Step 6
Finally, remove one Red Peg from each Grid. Optionally, consider replacing this with a White Peg (to be visually distinct). Below this is shown as a red X, e.g.:

Left Grid Right Grid
Please note: the map looks busy in this example because I’m using colours to aid explanation. In reality, you’d just have Red and White Pegs. The red X represents the point where the two levels interconnect. So in the above example, this could be stairs going from Room 4, Left Grid to Room 7, Right Grid. Of course, there is nothing stopping you adding more level interconnections. Again, this will help in ‘jaquaying-the-dungeon’. For simple bookkeeping, remove the pegs from matching positions e.g. 4;4 Left Grid leads to 4;4 Right Grid, and 7;7 Grid Left leads to 7;7 Right Grid. The connections do not need to be stairs, they could be tunnels etc. If doing this on paper, a mega dungeon can be made easily by simply using multiple paper grids and interconnecting them in this way.
What is this gibberish?
Here’s a link to my initial post about Grid-Crawls, hopefully that helps, else see the below example: Link
Below is a brief example of how to navigate a Grid-Crawl map:
The example does not consider any encounters in the rooms etc.
• The PCS start in Room 1 on the Left Grid, i.e. corresponding to Colum 1; Row 1. This position is marked with an S on the map.
• The DM Looks across Row 1 and down Column 1. There is a Non Red Peg in the 5 and 9 positions (see arrows), i.e.:

Left Grid
This means Room 1 connects to Rooms 5 and 9.
• The PCs decide to go to Room 5. In Room 5 the DM Looks across Row 5 and down Column 5. It can be seen that there are Non Red Pegs in the 1, 3, and 4 positions, i.e.:

Left Grid
From this it can be seen that Room 5 connects to Rooms 1, 3, and 4.
• The PCs then go to Room 4. The DM Looks across Row 4 and down Column 4. There is a Non Red Peg in the 5 and 7 positions, and a red X at the 4 position, i.e.:

Left Grid Right Grid
From this it can be seen that Room 4 connects to Rooms 5 and 7. Also, Room 4 Left Grid connects to Room 7 Right Grid, e.g. as marked by the red X on each grid.
• The PCs therefore can now move from the Left Grid (upper level) to the Right Grid (lower level) if they choose to …
• And so on.
Map
For the sake of completeness, I’ve gone to the effort of drawing out the Grid-Crawl above as a Point Crawl (please see maps below). I’ve done this just to show what kind of map this method generates. To be fair, part of the point of this system is for the DM not to have to draw a map (unless of course that brings you joy). The players are free to map as they will, and the DM might enjoy seeing their work :O|


The second map uses the option for secret passages as mentioned in Step 5 (i.e. for the Green Dots)
These point-crawl maps were made using: https://csacademy.com/app/graph_editor
Quick Method – Battleships Dungeon
Step 1
Start with two blank ‘Battleships Maps’ (probably best to renumber the top line ‘1 to 10’ rather than ‘A to J’).
Step 2
Place the ‘ships’ on each grid (as if you were playing the Battleships game). If doing this on paper grids, just shade in the squares.
Step 3
In each of the grids put a Red Peg in the diagonal positions, except for the top leftmost cells; i.e. at positions 2;2, 3;3, and 4;4 etc. In the paper method use a solid ‘dot’ in place of the peg.
Step 4
Put a White Peg in each Column somewhere, i.e. where there is a gap. In the paper method use an open (unshaded) ‘dot’ in place of the peg.
Step 5
Look across each Row, if a Row does not have a White Peg in it somewhere, then add one (these might represent secret passages).
Optionally, add a few extra White Pegs at random to increase same level interconnectivity.
Step 6
Finally, remove one Red Peg from each Grid. Optionally, consider replacing this with a White Peg (to be visually distinct). In the paper method you might put this down as an X.
Optionally, add an extra interconnectivity pathway between the grids (i.e. dungeon levels) in the same fashion.
– – –
Me on DriveThruDriveThru; at the moment I’m mainly pimping my procedural High Seas ‘Hex Crawl’ – In the Heart of the Sea.

Intriguing!
Are there any benefits to using this method, that you have thought of?
LikeLiked by 1 person
I think it could be useful for solo gamers.
The physical game version might be useful for partially sighted gamers, it’s tactile like Braille.
If combined with random dungeon dressing (like in my procedural adventure ‘Carapace’), the adventure emerges for the DM and players alike.
It takes the burden from the DM about having a ‘coherent’ map. The map ‘is what it is’.
But, mainly, it’s a bit of fun!!
:O)
LikeLiked by 1 person
I just stumbled on the battleship method on Drivethrurpg, and damn, it’s fun! I now have a point-to-point map for my next dungeon! Thanks!
I’ve also picked up a couple of your other things, including some hexflowers that I want to try. At the very least, your stuff is fascinating. And I think it’ll be very useful, too.
LikeLiked by 1 person
Hi Paul – thanks and I hope you get some good use out of them!
:O)
LikeLike